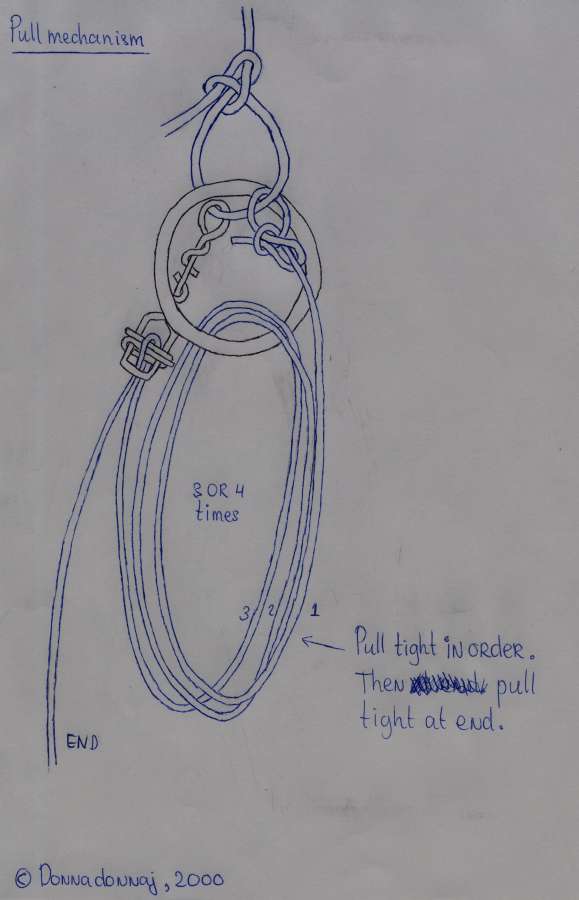
In order to be able to pull the rack tight, it is necessary to lay out three or four loops in a rope, so that the force with which you pull it tight, gets amplified by a factor four. The layout is shown on the drawing below. The rope that leaves the picture on the top, is connected to the soldering iron, and to the ice. The main rope of which the loops are made, should be a nylon rope, because of the elasticity.
The loops should be laid out in such a way that later, when your ankles are tied, you are unable to reach the ring and the rope lock. The loops should be large enough so that you can easily tie your hands through them. It is important that all loops are in the same direction.
Pulling the rope tight is quite hard. You must first pull the rope tight without the rope lock. First pull the rope tight at 1, then at 2, and then at 3, 4. Finally pull the rope at the end, so that it locks through the rope lock. You have to repeat the procedure a few times.
The rope will not slip back during the process, because it is pulled tight against the rope between your hands, which causes quite a lot of friction. (If you put another metal ring at your hands, it will be impossible to pull the rack tight, because then the rope will indeed slip back)
When you think that the rope is tight, then it can be always more tight. Move your ankles and hands a few times. There are usually a few centimeters to gain. Crawl as much as possible in the direction of your hands, thus making the ankle rope as tight as possible. Pull your arms strong towards you. Then let go, and at the same time pull the rope more tight at 2,3 or 4. Repeat this a few times. When you have collected some free rope, pull it tight through the rope lock.
