Release Methods
If you tie up yourself in a strict way, then you are going to
need some type of release mechanism. You can also
ask somebody else to free you, but then still
it is a good idea to use a release mechanism and to
set the time after the time on which you expect the
person. Just for in case the other person gets
stuck in traffic, or misunderstood the appointment.
Release mechanisms come in two types: The first type
works by keeping a set of keys out of your reach for
some time period (key release mechanisms). The second
type works by cutting a rope that is part of the
construction that keeps you tied up.
(I call these rope cutting mechanisms, although in
none of them the rope is actually cut)
Key release mechanisms have the advantage that they
are simple, and therefore reliable. However their
safety depends on other assumptions: That the keys fall
within your reach, and that you will be able to free
yourself, once you have them. After having been tied
up for some time, your abilities may be much decreased,
so be careful.
Always attach a sock to the set of keys with a rope
(see the drawing below) in order to make sure that
the set of keys will not bounce away when they fall.
I have always attached the key release mechanism to
the ceiling, while lying down on the floor in such
a way that I cannot stand (see the scenarios),
but still with quite some freedom.
If you want to be totally immobilized at one place,
then key release methods should not be used, because
the risk that the set of keys drops out of your
reach is too big.
Rope cutting mechanisms are more complicated, and
therefore technically less reliable, but they can
be used in cases where key release mechanisms cannot
be used, typically in situations where you are totally
unable to use your hands, when there is a risk that
the key falls out of reach of your hands, or where circulation
problems might occur.
I have used rope cutting mechanisms for the rack,
suspension, and for tying myself to a chair.
Important remark: Always use at least two release
methods. At least one them should not depend on
public electricity. All locks come with 2 keys.
If you are using a key release method,
then make two sets of keys, and put them on different
key releasers.
Key Release Methods
Icecube Release.
The icecube method is certainly the simplest method,
and the most reliable. The idea is simple: Use the melting
of an icecube to keep the keys away from you for a while.
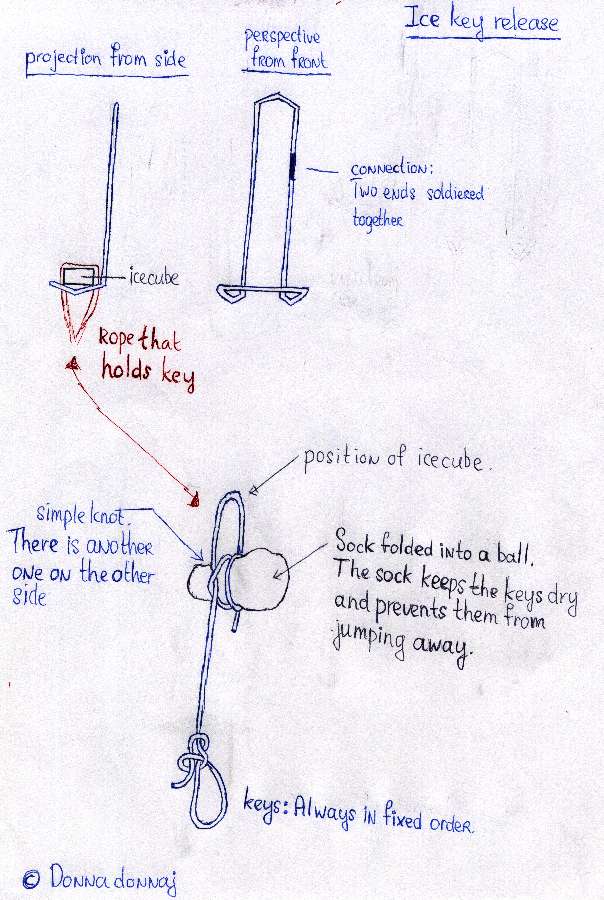
In order to achieve this, attach a
short wire (50cm) to the set of keys, together with a
sock, which prevents the keys from bouncing away,
and which will keep them dry. See the drawing below
for details.
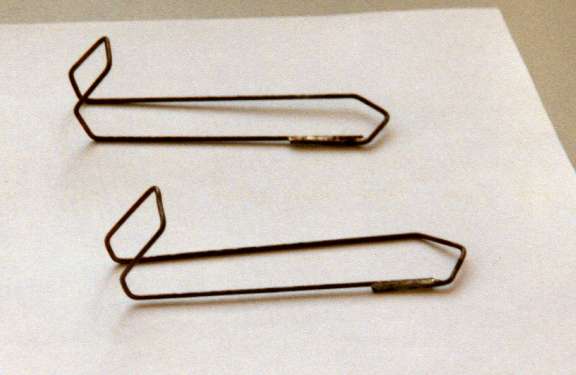
Put an icecube through the resulting noose,
and lay it on a double hook made from welding wire,
or other metal wire.
Hang the hook onto the ceiling.
When this is done correctly, the wire will never
touch anything but the ice, which makes the method
incredibly reliable. The main disadvantage of this
method is that the time after which the key drops
is at most 60 minutes in winter, 40 minutes in
summer. If this is too quick, you can use isolated
electricity cable instead of welding wire.
The melting time depends on the temperature in the room,
but is fairly constant as long as the temperature does
not change, so
you can find out in advance how long you are going to be
tied up.
If the time is too long, then hang the keys in
advance and wait a while. If you want to be tied up
longer you have to use another method.
There is no need to drill holes in the ceiling.
Because the
construction has little weight, you can use tape
to connect the metal hooks to the ceiling.
Soldering Iron with Metal Hook.
Take a soldering iron. Lay it down on a table in such
a way that it is stable, and that the warm end does not
touch the table. Switch it on and wait
for 10 minutes.
Now you can lay a metal hook on the tip, (made from thick,
massive electricity cable, or welding wire),
put a little bit of tin on the connection, and pull
the plug of the soldering iron. After 10 minutes the
tin is solid, and the hook is connected quite strongly
to the soldering iron.
Now you can hang the soldering iron by its wire on
the ceiling, and hang a set of keys on the hook.
You can use an electric timer to switch on the
soldering iron. Approximately 2 minutes after the soldering
iron is switched on, the hook will come down. The hook
won't be very hot, so it won't burn holes
in you, or in your carpet.
You should always combine this
method with the alarm clock method, so that you do not depend on
public electricity.
The Long Rope Principle.
The principle is very simple. Put the set of keys
at the end of a long rope and make sure that the
other end is within your reach.
(for example a rope used for kites). You can get
the key within your reach by pulling the rope all the
way. If you are sufficiently well tied, and the rope
is long enough, this can take quite a while and a lot
of effort.
It is important that there is no obstacle in the way,
behind which the key can get stuck, such as for
example a threshold. For me, the main disadvantage
of this method is that it inconsistent
with the helplessness principle:
By working harder you can free yourself quicker. I also
do not trust the safety very much, because the
set of keys may get stuck somewhere.
I have used the method only as a last backup release
during suspension. I put a very long rope on my toe,
with a chair at the other end.
The chair is out of my reach. If all else fails I
can pull the chair within my reach. I make the
rope so long, that I can absolutely certain that
the normal release mechanism releases me quicker
than I can pull the rope, when it works. So normally
the best choice is just to suffer until the time is over.
Rope Cutting Mechanisms
I know two rope cutting methods. In none of them a rope
is actually cut. In the first one a rope is melted by
a soldering iron. In the second one only ice melts.
Soldering Iron with Electronic Timer Device.
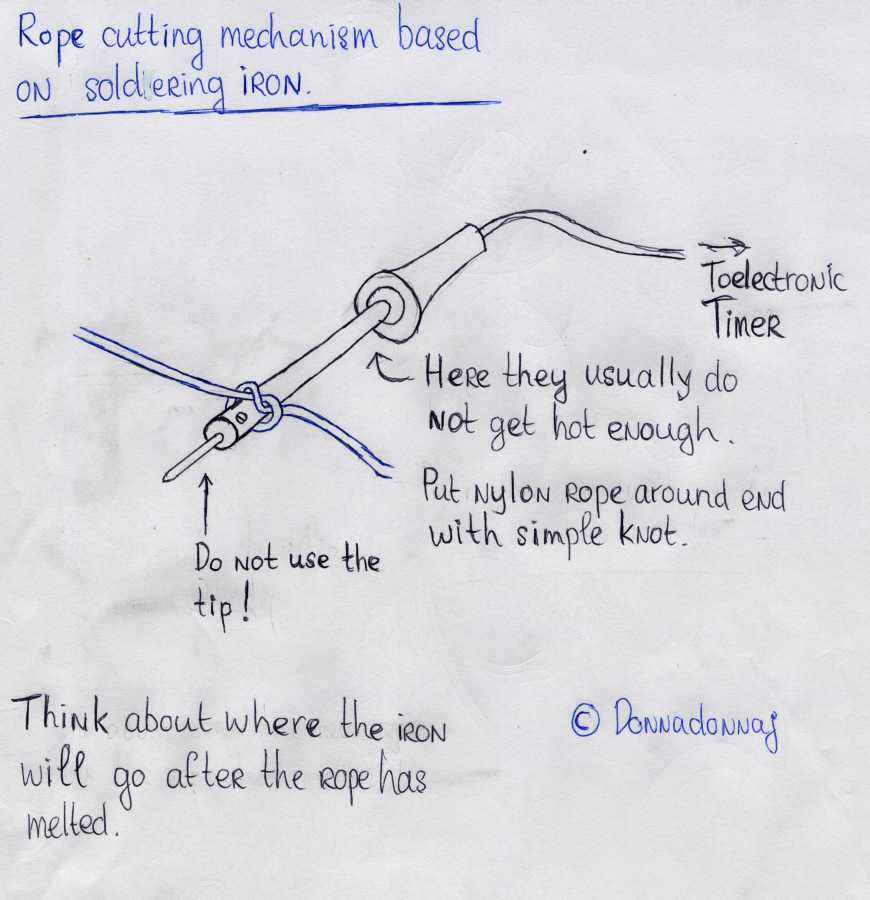
This method is easy to use, and very reliable. The idea
is simple: A soldering iron gets hot enough to melt
through a nylon rope. Tie a nylon rope around the soldering
iron with a simple knot, as is shown on the drawing.
The soldering iron can be connected to
an electronic timer. Approximately 2 minutes after the
soldering iron is switched on, the rope melts, and it will give way.
Always use a mechanical timing device. It will remember the
settings when electricity is shortly cut off.
As far as I know soldering irons are not capable of starting
a fire. I have tried two irons on various materials, namely
plastic (PET), alcohol, wood, wax. None of these ignited.
The only thing that I could ignite was the head of a match.
Make sure that the
rope is made from nylon. Think about where the soldering
iron goes after the rope has melted. Make sure it won't
touch anything made out of plastic, your carpet, its
own wire. Make sure that it cannot touch you!
Put a board under the soldering iron.
Don't use the tip, since the tip is usually not very
firmly connected to the frame.
The frame usually does not get hot enough at all places.
Usually it gets only hot near the end.
There must be a fairly high
force on the rope to make sure that the knot is pulled
tight against the frame.
This makes the method
inappropriate as key release method. Test the construction
many times!
Here is a drawing of the construction:
Icecubes with Force Divider.
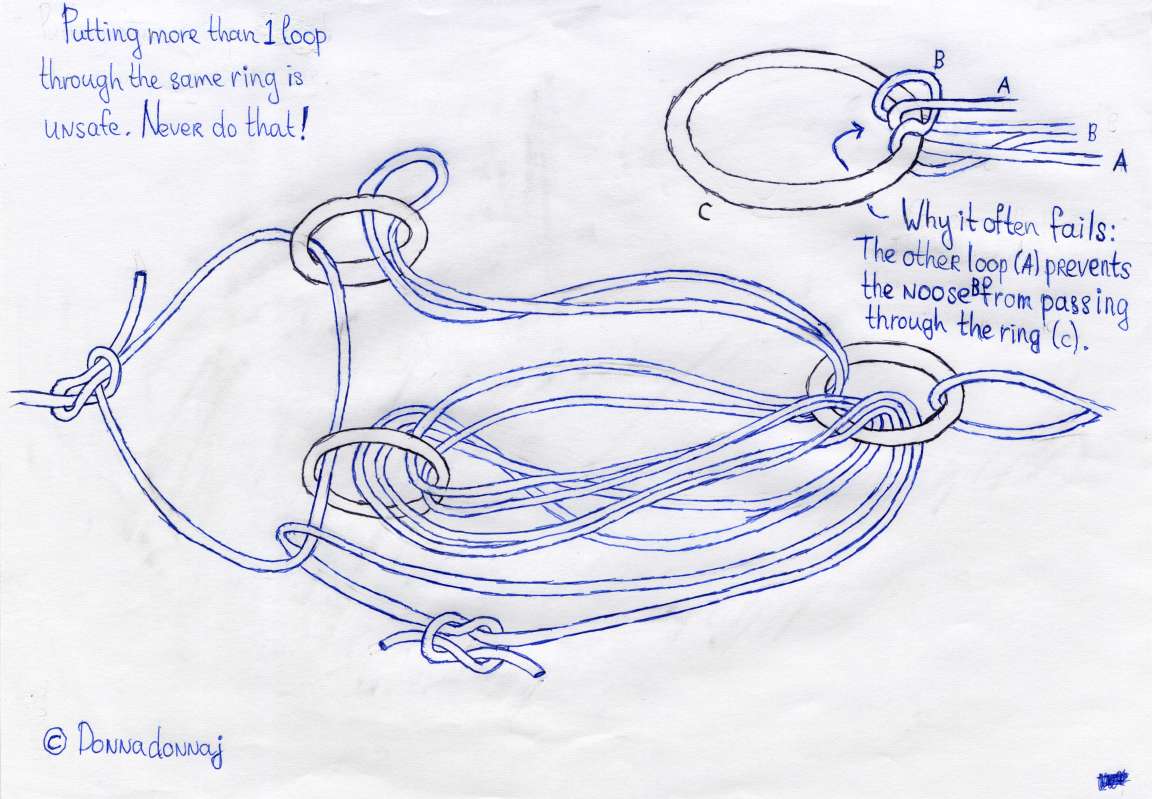
If you impose a high force on a icecube it will break.
However it is possible to divide the force as is shown
in the drawing. This makes it possible to construct
a rope cutting mechanism based on ice. I have used the
construction for suspension, so it is capable of supporting
pretty high forces. Test it in advance with something heavy.
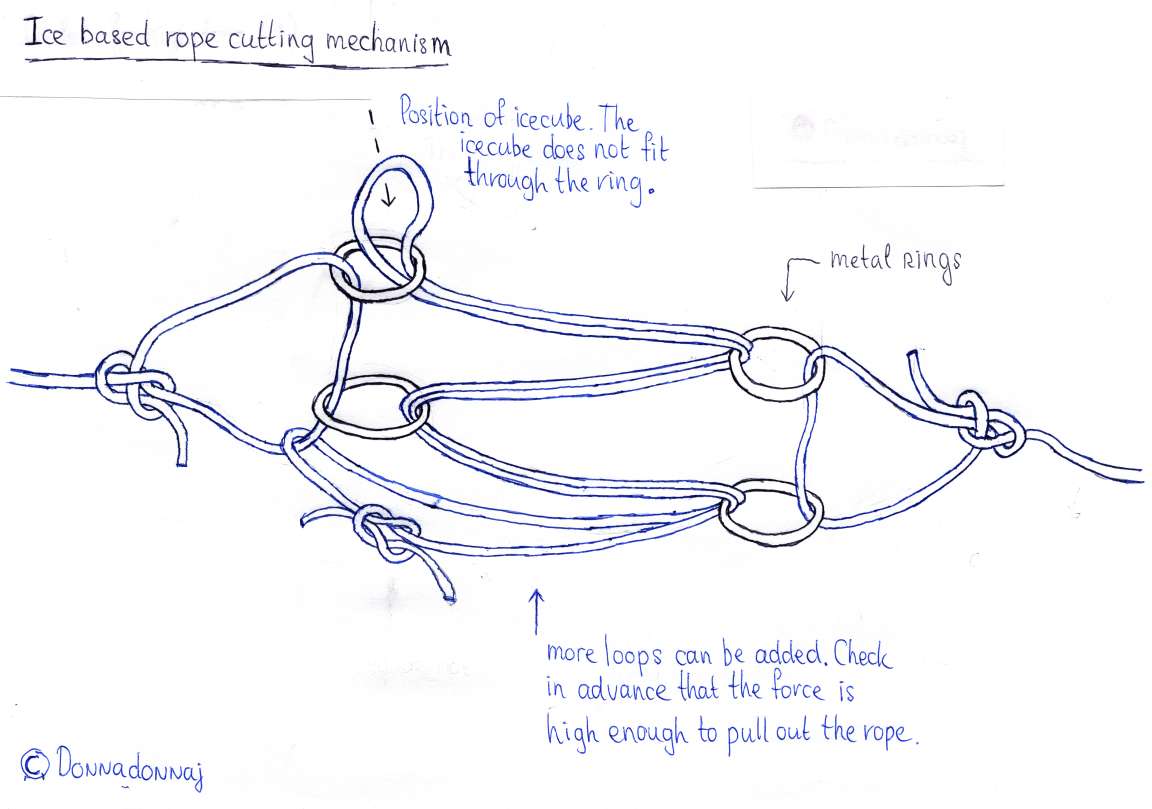
Don't attempt to save on the metal rings. If you put more
than one loop
through the same ring, the construction becomes
extremely unreliable. In fact it fails approximately
half of the times. Here is a drawing in which I attempt
to explain what goes wrong:
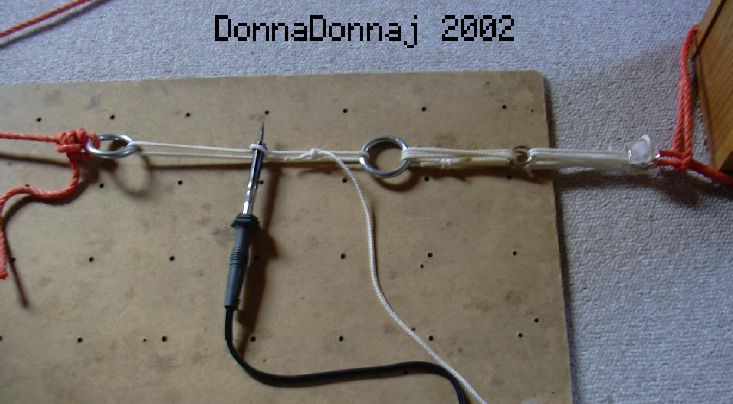
Pictures of Soldering Iron and Icecubes with force divider
soldering iron and icecube method should always be combined:
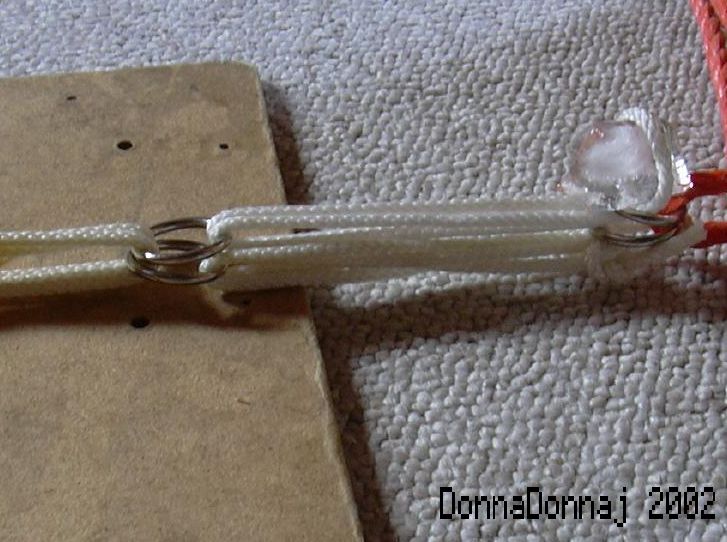
Detail of icecube with force divider:
Copyright
Copyright 2001-2017 DonnaDonnaj, all rights reserved.
The copyright extends to all contents, including drawings and pictures.


